transfer_call function path requires Python — see the comparison table below.
Use Call Handoffs (UI-based) for fixed transfer destinations with straightforward routing. Use transfer_call (code-based) for dynamic routing logic, custom SIP headers, or integrations like Zendesk. See the comparison table for details.
The SIP-based handoff methods described below apply to voice interactions. Webchat handoffs use HTTP-based integrations with your live chat platform. To manage handoff states programmatically, visit the Handoff API documentation.
Handoff is the primary human-in-the-loop (HITL) mechanism in Agent Studio: the agent runs autonomously by default and escalates to a human only when needed. Configure when the agent escalates with Managed Topic actions and flow actions; configure what context the human receives with the fields documented in Handoff context handover below.
Related handoff documentation
- Handoff actions in FAQs - Add handoff triggers to Knowledge topics
- Handoff States API guide - Monitor transitions between automated and live agents
- Handoff API reference - Retrieve handoff context for downstream systems
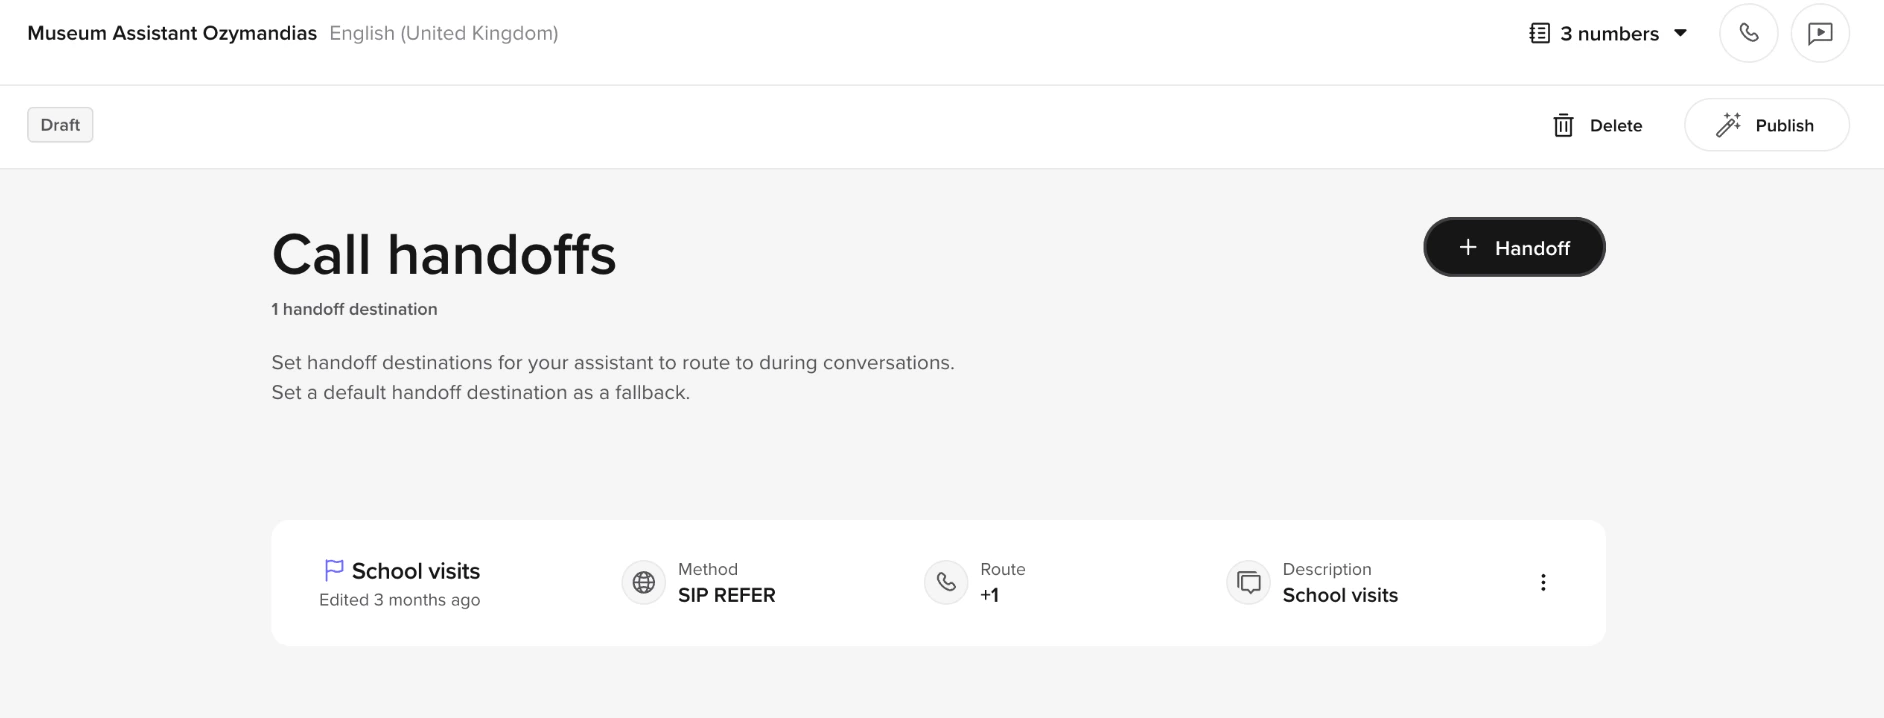
Adding a handoff destination
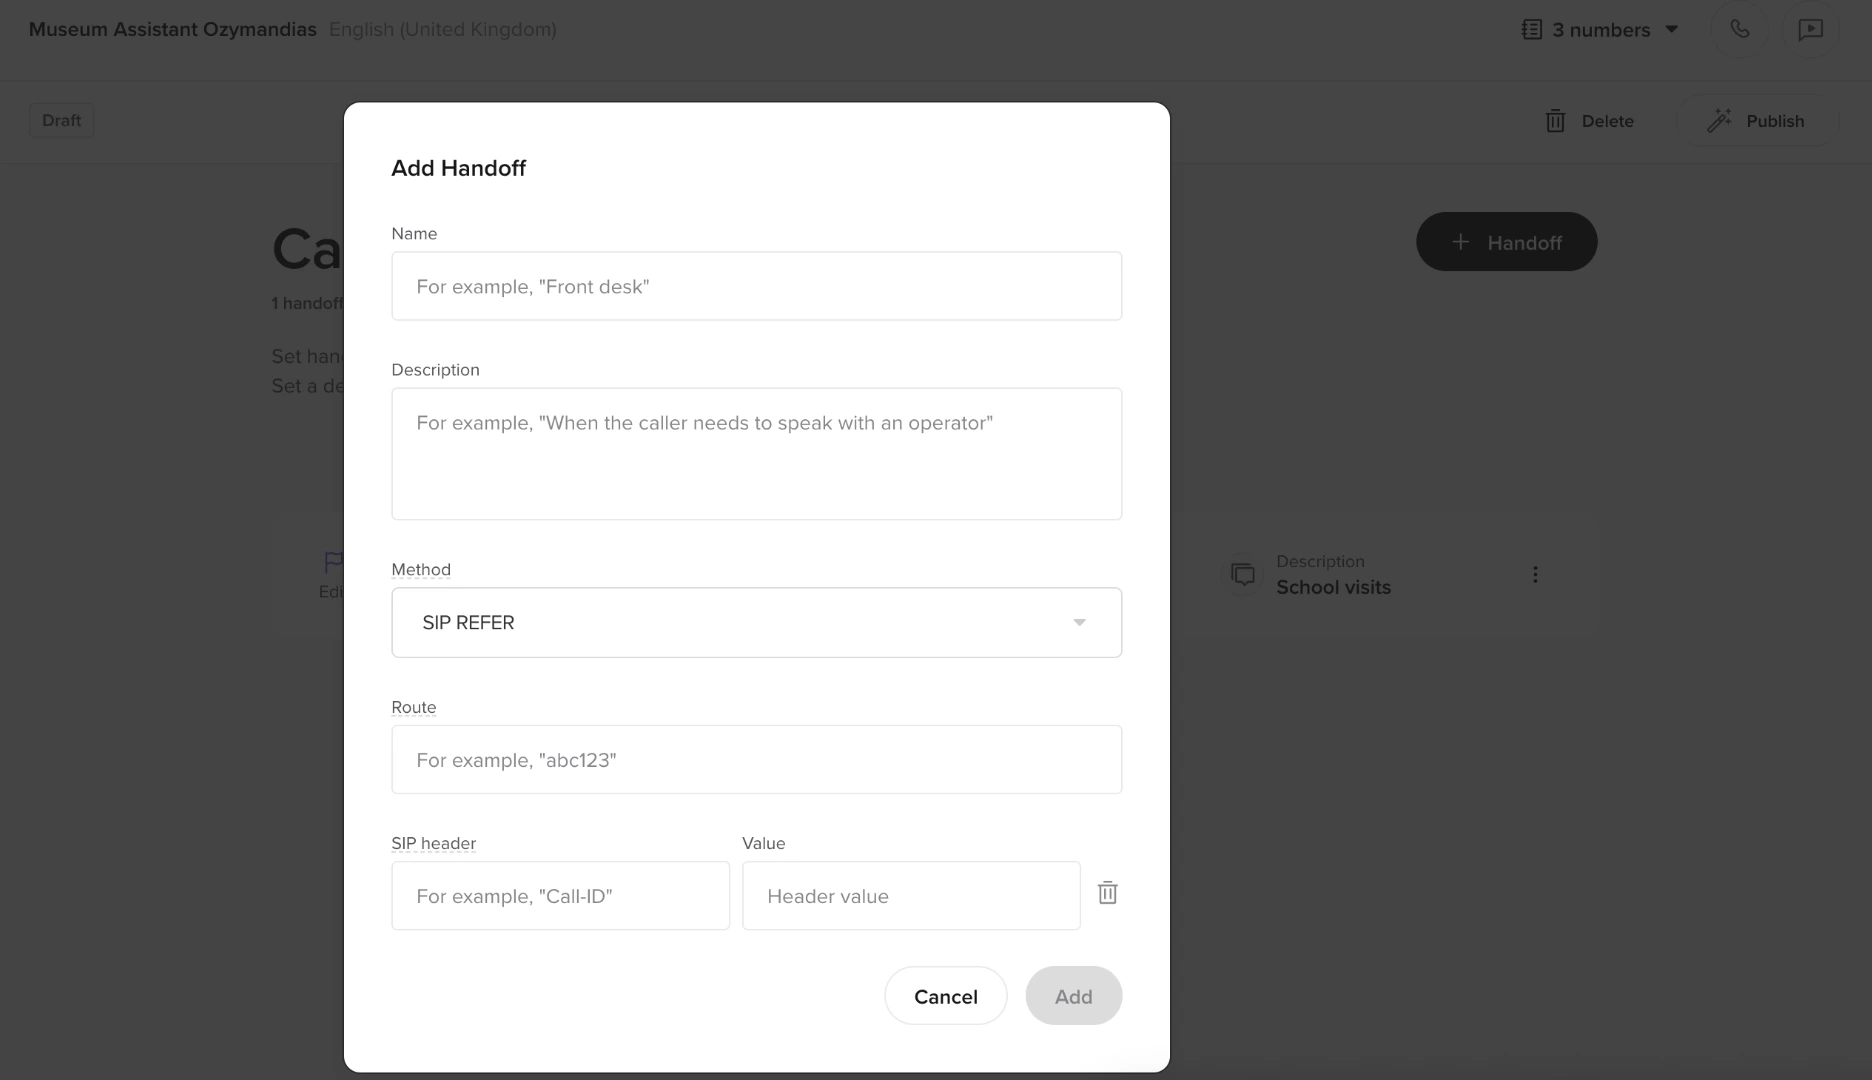
To create a new handoff destination:- Go to Voice > Handoffs in the sidebar.
- Click Add Handoff.
- Fill in the following details:
- Name: Enter a descriptive name (e.g., “Front desk”).
- Description: Add a note about when to use this handoff (e.g., “When the user needs to speak with an operator”).
- Method: Choose the SIP method to use for call routing. Options include:
- SIP REFER (default) – PolyAI specifies a transfer destination to the client (SBC), then drops from the call.
- SIP INVITE – PolyAI creates a new call with the destination and acts as a bridge between the client SBC and the destination.
- SIP BYE – PolyAI signals that its call leg is over, allowing the client SBC to take the call back over.
- Route: Specify the destination SIP URI or extension (only applies to SIP INVITE and SIP REFER).
- SIP headers: Add optional SIP headers to include metadata or routing instructions.
- Click Add to save the destination.
Configuring SIP headers
SIP headers can be used to send additional metadata when making a handoff. To add SIP headers:- Click Add SIP Header in the handoff setup modal.
-
Enter a Header Name (e.g.,
X-Customer-ID).- Custom headers should start with an
X-prefix.
- Custom headers should start with an
-
Enter a Value (e.g.,
abc123). -
You can use variables prefixed with
$in the SIP header values for dynamic data. Example:X-Caller-ID: $caller_id - Repeat as needed for multiple headers.
Default handoff
One handoff destination can be marked as the default. This is the fallback destination used when no specific routing matches – for example, when the caller requests a transfer but no topic or flow step maps to a specific handoff.- The first handoff you create is automatically set as the default.
- To change the default, open the actions menu on a handoff card and select Set as default.
- If the default handoff is deleted, you should assign a new default to avoid unrouted transfers.
Managing handoffs
Once a handoff destination is created, it will appear in the list of destinations. From the actions menu on each card, you can:- Edit – modify the name, description, method, route, or SIP headers
- Duplicate – create a copy of an existing handoff for a similar destination
- Delete – remove the handoff (requires typing the name to confirm)
- Set as default – mark as the fallback handoff destination
Encryption options
When using SIP INVITE, you can choose the transport encryption:
Encryption only applies to SIP INVITE. SIP REFER and SIP BYE delegate transport to the carrier or SBC.
Integration-level constraints
Your telephony integration (e.g. Twilio, SIP trunk) may impose constraints on handoff configuration. When constraints are active:- The SIP method dropdown may be locked to a specific method (e.g. all handoffs must use SIP REFER)
- The route/phone number field may be hidden if routing is handled by the carrier
- The SIP headers section may be hidden if the integration does not support custom headers
Best practices for call handoffs
- Use clear descriptions – label handoffs with their intended use (e.g. “Billing disputes” not “Team A”)
- Always have a default – ensure one handoff is marked as default so unmatched transfers have a destination
- Test in sandbox – verify handoff destinations route correctly before promoting to Live
- Use SIP headers for context – pass metadata like
X-Customer-IDorX-Reasonso the receiving system can route or display caller context
Handoff reason and utterance
Handoff reason and utterance
Handoff reason and utterance
The built-in handoff template and the
conv.call_handoff() helper accept two optional, structured fields:Where it shows up
- Flows & KB actions – Selecting builtin-handoff displays Reason and Pre-handoff utterance fields.
- Functions – Call
conv.call_handoff(destination="...", reason="...", utterance="...")to escalate programmatically. - Conversation Review – Both fields appear in the metadata panel for quick troubleshooting.
- Conversations API – Returned inside the
handoffobject for BI dashboards or CRM routing.
- Removes guesswork when diagnosing handoffs – no more relying on LLM summaries alone.
- Enables fine-grained routing rules in telephony or CRM systems.
- Gives QA teams full visibility into the exact wording customers heard.
Handoff context handover
When the agent transfers a caller to a human, the human-side system needs context about what already happened. PolyAI exposes that context through three complementary channels — pick whichever your contact-center platform supports.
The data the agent writes (and the human therefore sees) is whatever you choose to store. Common fields:
- Identifiers –
customer_id,account_number,shared_idlinking the PolyAI conversation to a record in your CRM - Verification status –
successfully_identified,auth_method,verification_attemptsso the agent doesn’t ask the caller to re-verify - Reason for escalation – machine-readable
reason(e.g.policy_violation,complaint_escalation,customer_refund); see Handoff reason and utterance - Pre-handoff utterance – the exact wording the agent used before transferring, logged for QA
- Caller intent and slots – any entities collected during the AI portion of the call (order ID, refund amount, preferred callback time)
Writing context from a function
destination parameter must match a handoff configured under Voice > Handoffs. The reason and utterance surface in Conversation Review and the Conversations API; the sip_headers are merged with any headers configured on the destination, with values passed here taking precedence.
Webchat and SMS handoffs
Webchat and SMS use the same conceptual model but signal the handoff over the Chat API: thechat/respond response includes a handoff object with destination and reason, and end_conversation is set to true. Your widget or SMS connector then routes the session to your live-chat platform and retrieves the full context via the Handoff API. See Webchat and SMS handoff via the Chat API for the integration steps.
Feedback loops from the human side
Once a human has handled the escalation, you can close the loop in two ways:- Tag the conversation in Conversation Review. Live agents (or QA reviewers) can apply annotations such as Escalated unnecessarily or Wrong topic directly on the PolyAI conversation. Tagged calls surface in QA workflows and Smart Analyst queries.
- Push outcomes back via the Conversations API. If your CRM captures a resolution code on the human-handled portion, attach it back to the conversation by
shared_id. This pairs the agent’sreasonfield with the human’s actual outcome, which is what Smart Analyst needs to answer questions like “What share of complaint escalations were resolved on first contact?”.
Using your own Twilio number
If you’re bringing your own Twilio phone number to route calls, follow these steps to integrate it as a handoff destination:-
Connect your Twilio account:
- Ensure your Twilio account is set up and you have the necessary credentials (Account SID, Auth Token).
- Go to Voice > Numbers in the Agent Studio.
- Enter your Twilio credentials to connect your account securely.
-
Assign a Twilio number:
- Choose a number from your Twilio account to use for routing calls.
- If necessary, provision new numbers directly using the Twilio console.
-
Set up routing in Twilio:
- Configure your Twilio number to route calls to your PolyAI agent by setting the Webhook URL in your Twilio console. Example:
- Voice Webhook URL:
https://your-polyai-instance-url/voice/call
- Voice Webhook URL:
- Make sure your webhook supports POST requests and uses the correct authentication methods.
- Configure your Twilio number to route calls to your PolyAI agent by setting the Webhook URL in your Twilio console. Example:
-
Add the Twilio number as a handoff destination:
- In the Call Handoffs section, use the Twilio number as the “Extension / Number” field when creating a new destination.
- Add a description specifying its purpose (e.g., “Route to Twilio-based live agent team”).
US-based Twilio SMS numbers must be registered for A2P 10DLC. See the Twilio handoff guide for details.
Comparison: Call Handoff and the transfer_call function
These two methods serve similar purposes – routing the user to another endpoint – but are mutually exclusive and differ in flexibility and implementation.
In the table below, means the feature is supported and – means it is not supported.
The UI-based Call Handoff does not support custom metrics. Use
transfer_call with conv.write_metric() if you need handoff reason codes for analytics.
When to use each method
UseCall Handoff if:
- You want a quick setup through Agent Studio with minimal code.
- Your routing needs are straightforward and based on static values.
transfer_call if:
- You need to pass dynamic SIP headers (e.g., customer metadata).
- You want to use soft handoffs or log custom handoff metrics.
- You’re integrating with a platform that does not support SIP REFER (e.g. Zendesk).
Voicemail detection
PolyAI can detect voicemail in certain scenarios, but the behavior depends on the call direction and handoff method.Outbound calls
For outbound calls, PolyAI supports project-level voicemail detection. A detection flow at the start of the call classifies what the agent hears before the conversation begins. Common classifications include human, IVR, voicemail, and number not in service – though the exact categories depend on how the project is configured. Based on the classification, the agent typically routes into the appropriate path. For example:- Human – proceed to the greeting and main conversation flow
- IVR – enter an IVR traversal flow (DTMF navigation, hold loops)
- Voicemail – leave a message or hang up, depending on project requirements
- Number not in service – end the call
Inbound SIP handoffs
When PolyAI transfers an inbound call to an agent (via SIP REFER, SIP INVITE, or SIP BYE), voicemail detection on the destination side is not available by default. The behavior depends on the handoff method:- SIP REFER / SIP BYE – PolyAI drops from the call after initiating the transfer, so it has no visibility into whether the destination answers or goes to voicemail.
- SIP INVITE – PolyAI bridges both call legs, which provides more visibility during the transfer. However, automated voicemail detection on the destination side is not a standard feature.
Related pages
Handoff States API
Monitor transitions between automated and live agents.
Handoff API reference
Retrieve handoff context programmatically.
Twilio handoff
Twilio-specific handoff configuration.