> ## Documentation Index
> Fetch the complete documentation index at: https://docs.poly.ai/llms.txt
> Use this file to discover all available pages before exploring further.
# MCP integrations
> Connect your agent to external MCP servers so it can call their tools during conversations.
Connect your agent to external [Model Context Protocol](https://modelcontextprotocol.io/) (MCP) servers so it can use the tools they expose during conversations — look up data, trigger actions, or interact with third-party systems without writing custom code.
This page covers connecting Agent Studio **to** third-party MCP servers as a client. PolyAI does not currently expose its own MCP server for external tools to connect to your agents.
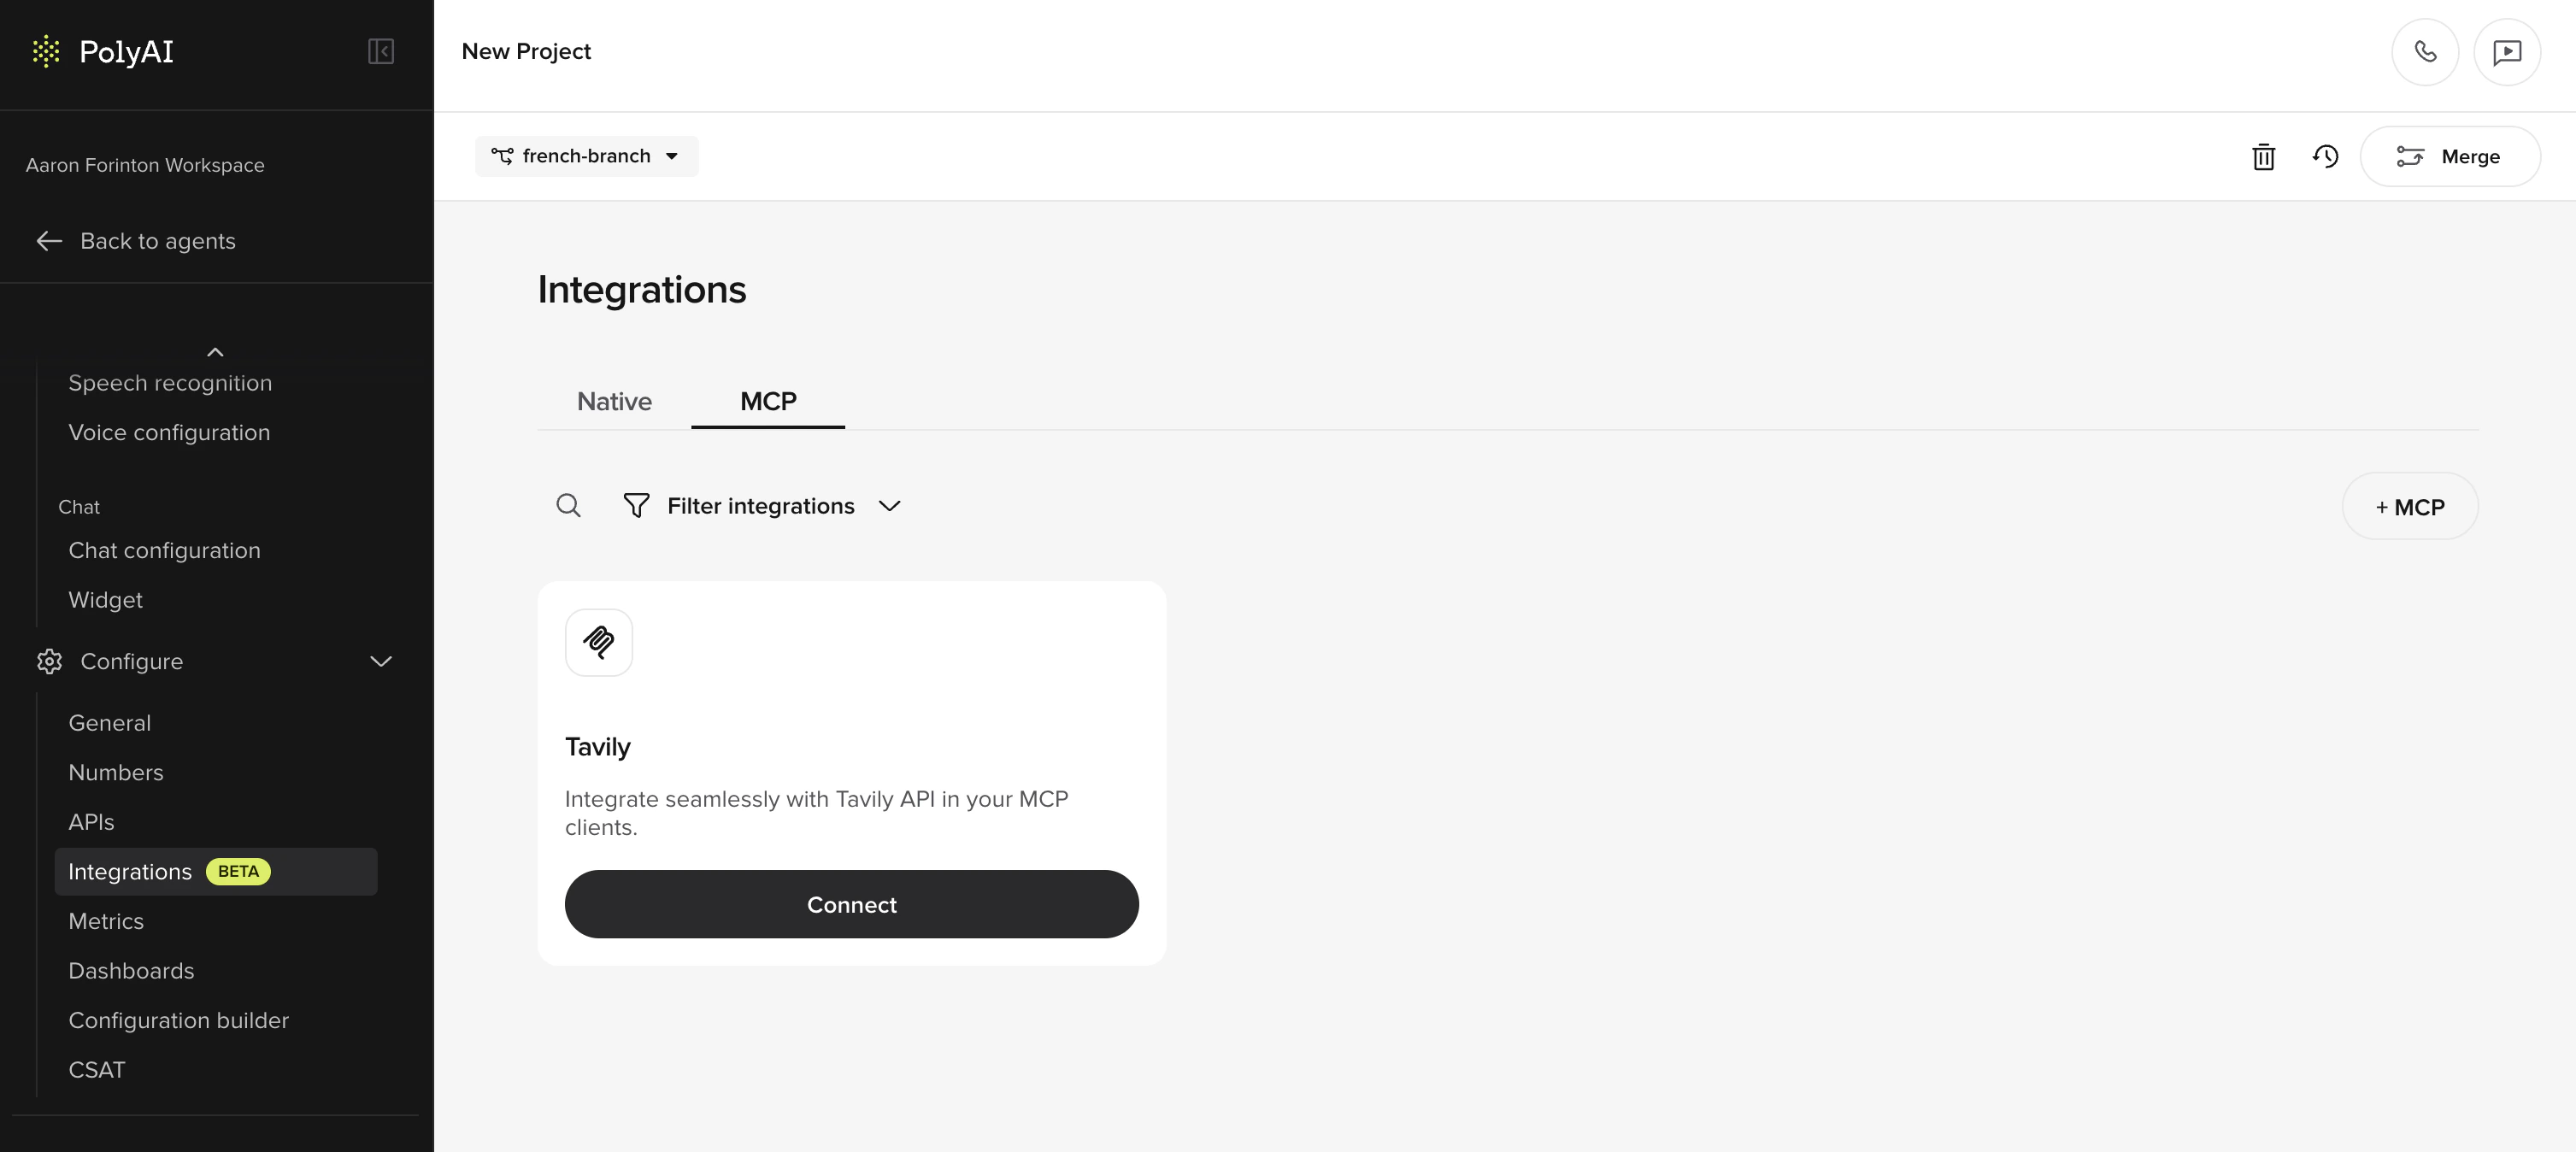 This feature is available from **Integrations** in Agent Studio under the **MCP** tab.
## How it works
When you add an MCP server, Agent Studio connects to the server endpoint and discovers the tools it exposes. Each tool has a name, description, and input schema defined by the server — you don't need to configure these manually.
During a conversation, your agent can call any enabled MCP tool. The flow is:
1. **Discovery** — Agent Studio sends a discovery request to the MCP server URL and receives a list of available tools with their schemas.
2. **Configuration** — You review the discovered tools and toggle on the ones your agent should use.
3. **Execution** — When the agent decides to use a tool during a conversation, Agent Studio sends a tool call to the MCP server with the appropriate authentication and waits for a response (up to the configured timeout).
4. **Response** — The MCP server runs the tool and returns the result. The agent uses the response to continue the conversation.
The MCP server controls *what* tools are available, and you control *which* of those tools the agent can use. Toggling tools off keeps them out of the agent's context window, keeping prompts focused and efficient.
## When to use MCP
MCP integrations let your agent act as an MCP **client** that connects to external MCP servers. Instead of writing custom [functions](/tools/introduction) and [API configurations](/integrations/api/introduction), you point Agent Studio at an MCP server URL and the platform discovers the available tools automatically.
Common use cases include:
* Connecting to internal business systems that expose MCP endpoints
* Adding third-party tool capabilities to your agent
* Reusing tools across multiple agents without duplicating code
## Prerequisites
* You must have the **Admin** role in Agent Studio. If you don't have admin access, ask an existing admin to [update your role](/user-management/invite-users).
* The MCP server must be accessible over HTTPS
* If the server requires authentication, you need the credentials and a [secret](/secrets/introduction) stored in the Secrets Vault with access granted to your project
## Add an MCP integration
Go to **Integrations** and select the **MCP** tab.
Click **Add MCP integration**. In the modal, configure:
| Field | Description |
| ----------------------- | ----------------------------------------------------------------------------------------------------------------- |
| **MCP server URL** | The HTTPS endpoint of the MCP server (e.g., `https://mcp.example.com`) |
| **Timeout** | How long to wait for the server to respond, in seconds (1–30, default 10) |
| **Authentication type** | Optional. Choose **Header**, **Query parameter**, or **OAuth** depending on how the server authenticates requests |
Select an authentication type and fill in the required fields:
Send a secret value in an HTTP header.
| Field | Description |
| --------------- | ------------------------------------------------------------------------------------- |
| **Header name** | The header the server expects (e.g., `X-API-Key`) |
| **Secret name** | A [secret](/secrets/how-to-setup) from the Secrets Vault that contains the credential |
Append a secret value as a URL query parameter.
| Field | Description |
| ------------------------ | ------------------------------------------------------------------------------------- |
| **Query parameter name** | The parameter the server expects (e.g., `api_key`) |
| **Secret name** | A [secret](/secrets/how-to-setup) from the Secrets Vault that contains the credential |
Authenticate using OAuth 2.0 client credentials.
| Field | Description |
| ---------------------- | ---------------------------------------------------------------------------------------- |
| **Client ID** | The OAuth client identifier |
| **Client secret name** | A [secret](/secrets/how-to-setup) from the Secrets Vault that contains the client secret |
| **Token URL** | The OAuth token endpoint (e.g., `https://auth.example.com/oauth/token`) |
| **Audience** | Optional. The intended audience for the token |
| **Scope** | Optional. Select **Read**, **Write**, or both |
Add secrets in the **Secrets** page before configuring MCP authentication. Each secret must have access granted to your project. See [Secrets](/secrets/introduction) for setup instructions.
Click **Connect**. Agent Studio discovers the tools available on the MCP server and displays them in the configuration panel.
Toggle individual tools on or off in the configuration panel. Only enabled tools are available to your agent during conversations.
## Use MCP tools in prompts
Once an MCP server is connected, discovered tools are available to the LLM in step prompts. There are two approaches.
### Basic usage
Name the tool and give a brief description of what it does. The LLM reads the tool's input schema directly from the MCP server, so you don't need to specify parameters.
```
### Available tools
1. join_session
- Initiates a screen sharing session using a six-digit code provided by the user.
```
This is the simplest approach — minimal prompt maintenance, and the LLM figures out the inputs from the schema.
### Advanced usage
For complex tools where the LLM may struggle with correct inputs, you can specify the expected parameters explicitly in the prompt:
```
CALL: highlight_element_and_wait({
cbid: "uXX-123",
session_id: "...",
user_message: "Click the Billing tab"
})
```
You can also wrap MCP tool calls with [platform functions](/tools/introduction) for additional logic like metric logging or state updates. For example, call a function after an MCP tool succeeds to log the result or trigger a step transition.
Explicit input specs add maintenance overhead — schema changes on the MCP server force prompt updates. Use only when the basic approach is unreliable.
### Whitelisting tools by URL
You can restrict which tools are exposed by the MCP server using the `tools` query parameter in the server URL:
```
https://mcp.example.com?tools=join_session,get_html
```
This limits tool discovery to only the listed tools, which is useful when the server exposes more tools than your agent needs.
## Manage MCP integrations
After connecting, you can:
* **Edit settings** — Click an MCP integration card to open the configuration panel and update the server URL, timeout, or authentication
* **Refresh tools** — Click **Refresh** in the configuration panel to re-discover available tools from the server
* **Toggle tools** — Enable or disable individual tools without disconnecting the server
* **Disconnect** — Remove an MCP integration entirely. Your agent will no longer have access to its tools
## Troubleshooting
Verify that the MCP server URL is correct and accessible over HTTPS. Check that any required authentication credentials are configured and that the associated secret has access to your project.
The MCP server may not expose any tools, or the discovery request may have timed out. Try increasing the timeout value and clicking **Refresh**.
Confirm that the tools are toggled on in the configuration panel. Only enabled tools are accessible during conversations.
Projects that previously configured MCP through experimental config will continue to work – existing servers keep running in the background. The old config is only replaced when you add a new MCP server through the Integrations UI. Once migrated, manage all MCP servers from the UI.
This feature is available from **Integrations** in Agent Studio under the **MCP** tab.
## How it works
When you add an MCP server, Agent Studio connects to the server endpoint and discovers the tools it exposes. Each tool has a name, description, and input schema defined by the server — you don't need to configure these manually.
During a conversation, your agent can call any enabled MCP tool. The flow is:
1. **Discovery** — Agent Studio sends a discovery request to the MCP server URL and receives a list of available tools with their schemas.
2. **Configuration** — You review the discovered tools and toggle on the ones your agent should use.
3. **Execution** — When the agent decides to use a tool during a conversation, Agent Studio sends a tool call to the MCP server with the appropriate authentication and waits for a response (up to the configured timeout).
4. **Response** — The MCP server runs the tool and returns the result. The agent uses the response to continue the conversation.
The MCP server controls *what* tools are available, and you control *which* of those tools the agent can use. Toggling tools off keeps them out of the agent's context window, keeping prompts focused and efficient.
## When to use MCP
MCP integrations let your agent act as an MCP **client** that connects to external MCP servers. Instead of writing custom [functions](/tools/introduction) and [API configurations](/integrations/api/introduction), you point Agent Studio at an MCP server URL and the platform discovers the available tools automatically.
Common use cases include:
* Connecting to internal business systems that expose MCP endpoints
* Adding third-party tool capabilities to your agent
* Reusing tools across multiple agents without duplicating code
## Prerequisites
* You must have the **Admin** role in Agent Studio. If you don't have admin access, ask an existing admin to [update your role](/user-management/invite-users).
* The MCP server must be accessible over HTTPS
* If the server requires authentication, you need the credentials and a [secret](/secrets/introduction) stored in the Secrets Vault with access granted to your project
## Add an MCP integration
Go to **Integrations** and select the **MCP** tab.
Click **Add MCP integration**. In the modal, configure:
| Field | Description |
| ----------------------- | ----------------------------------------------------------------------------------------------------------------- |
| **MCP server URL** | The HTTPS endpoint of the MCP server (e.g., `https://mcp.example.com`) |
| **Timeout** | How long to wait for the server to respond, in seconds (1–30, default 10) |
| **Authentication type** | Optional. Choose **Header**, **Query parameter**, or **OAuth** depending on how the server authenticates requests |
Select an authentication type and fill in the required fields:
Send a secret value in an HTTP header.
| Field | Description |
| --------------- | ------------------------------------------------------------------------------------- |
| **Header name** | The header the server expects (e.g., `X-API-Key`) |
| **Secret name** | A [secret](/secrets/how-to-setup) from the Secrets Vault that contains the credential |
Append a secret value as a URL query parameter.
| Field | Description |
| ------------------------ | ------------------------------------------------------------------------------------- |
| **Query parameter name** | The parameter the server expects (e.g., `api_key`) |
| **Secret name** | A [secret](/secrets/how-to-setup) from the Secrets Vault that contains the credential |
Authenticate using OAuth 2.0 client credentials.
| Field | Description |
| ---------------------- | ---------------------------------------------------------------------------------------- |
| **Client ID** | The OAuth client identifier |
| **Client secret name** | A [secret](/secrets/how-to-setup) from the Secrets Vault that contains the client secret |
| **Token URL** | The OAuth token endpoint (e.g., `https://auth.example.com/oauth/token`) |
| **Audience** | Optional. The intended audience for the token |
| **Scope** | Optional. Select **Read**, **Write**, or both |
Add secrets in the **Secrets** page before configuring MCP authentication. Each secret must have access granted to your project. See [Secrets](/secrets/introduction) for setup instructions.
Click **Connect**. Agent Studio discovers the tools available on the MCP server and displays them in the configuration panel.
Toggle individual tools on or off in the configuration panel. Only enabled tools are available to your agent during conversations.
## Use MCP tools in prompts
Once an MCP server is connected, discovered tools are available to the LLM in step prompts. There are two approaches.
### Basic usage
Name the tool and give a brief description of what it does. The LLM reads the tool's input schema directly from the MCP server, so you don't need to specify parameters.
```
### Available tools
1. join_session
- Initiates a screen sharing session using a six-digit code provided by the user.
```
This is the simplest approach — minimal prompt maintenance, and the LLM figures out the inputs from the schema.
### Advanced usage
For complex tools where the LLM may struggle with correct inputs, you can specify the expected parameters explicitly in the prompt:
```
CALL: highlight_element_and_wait({
cbid: "uXX-123",
session_id: "...",
user_message: "Click the Billing tab"
})
```
You can also wrap MCP tool calls with [platform functions](/tools/introduction) for additional logic like metric logging or state updates. For example, call a function after an MCP tool succeeds to log the result or trigger a step transition.
Explicit input specs add maintenance overhead — schema changes on the MCP server force prompt updates. Use only when the basic approach is unreliable.
### Whitelisting tools by URL
You can restrict which tools are exposed by the MCP server using the `tools` query parameter in the server URL:
```
https://mcp.example.com?tools=join_session,get_html
```
This limits tool discovery to only the listed tools, which is useful when the server exposes more tools than your agent needs.
## Manage MCP integrations
After connecting, you can:
* **Edit settings** — Click an MCP integration card to open the configuration panel and update the server URL, timeout, or authentication
* **Refresh tools** — Click **Refresh** in the configuration panel to re-discover available tools from the server
* **Toggle tools** — Enable or disable individual tools without disconnecting the server
* **Disconnect** — Remove an MCP integration entirely. Your agent will no longer have access to its tools
## Troubleshooting
Verify that the MCP server URL is correct and accessible over HTTPS. Check that any required authentication credentials are configured and that the associated secret has access to your project.
The MCP server may not expose any tools, or the discovery request may have timed out. Try increasing the timeout value and clicking **Refresh**.
Confirm that the tools are toggled on in the configuration panel. Only enabled tools are accessible during conversations.
Projects that previously configured MCP through experimental config will continue to work – existing servers keep running in the background. The old config is only replaced when you add a new MCP server through the Integrations UI. Once migrated, manage all MCP servers from the UI.